
Trellises = Shelf How’d we get here?
Like a calico cat, this shelf is a patchwork. I’d consider this a necessity build. We needed something to hold the candles my wife makes at the Painted Tree kiosk I run. Not wanting to drop a bunch of money into another project was my first consideration. I was just coming off of building the booth in B7. That was a good amount of blood and treasure sunk.
I had enough drop wood left from the booth to pull off some shelves. I didn’t have anything laying around that would make the vertical components. Unrelated to the need for a shelf project I had some large trellises.

I’m going a different route this year because my soil is apparently bad? I’m going to do above ground planter boxes and build trellises into and out of those. Anyway, these have been floating around a little homeless. The trellises needed to go.
I decided I would use those in the design. I wanted a worn look regardless, so it really lent itself well to that. The steel has a patina you only get the slow way, and it was here. So with those wins in the bag I started cutting the trellis up and making a simple frame.
The shelf itself was this assembly created three times with some bars in between for depth. Two assemblies of the same height on the front and back and the shorter of the three in the middle. I thought on doing something more with the top, and I would have used that space created. For a couple small reasons I decided not to, the biggest reason being time.

The steel has been outside all day everyday for two years. It has gone through quite a few moves in the yard and always in a semi-violent way. It was straighter than you’d think it would be, but the warp is real. All things considered I got it square. Enough so, that I fit square cut wood pieces in it without a gross amount of wiggle.

Those spacer bars are being installed in this photo.

Here the glorious girl is taking her first walk-about.

Fixing the wood down on this project was an easy deal. I simply took the dimensions across where the wood would go. I went with 2 inches wide because I liked it. So something like a 8″x2″ piece of 14 gauge with a 3/6ths wide slot cut down the length of it.

The only trick to this is there is one, was placing each mounting plate over the joints in the wood. Considering my routing method they were going to need a little help in doing the heavy lifting.
Each support slat is placed right below where the wood joints will be located. 2″ wide pieces allow for plenty of support.

I had a lot of fun with this project. It was definitely a feel it as you go type of thing. I used to work for very stringent qc. It is a lot of fun to build with artistic tolerances in mind.
The frame went together very easily on this, while the wood was another story. Doing what I think marginal work, it still took time. Each board had to be routed around the perimeter. Each board needed some type of edge prep where they would meet with another board. Apparently I didn’t take nearly as many photos of this as I thought.
If you’ll notice the edge of the wood on the perimeter. I had to use the cove bit to bring that edge down. The wood is 3/4″ thick while the steel is only 1/2″. Instead of having that sharp ledge between the two, I knocked down the wood. I thought it was necessary to make the two mediums flow together.

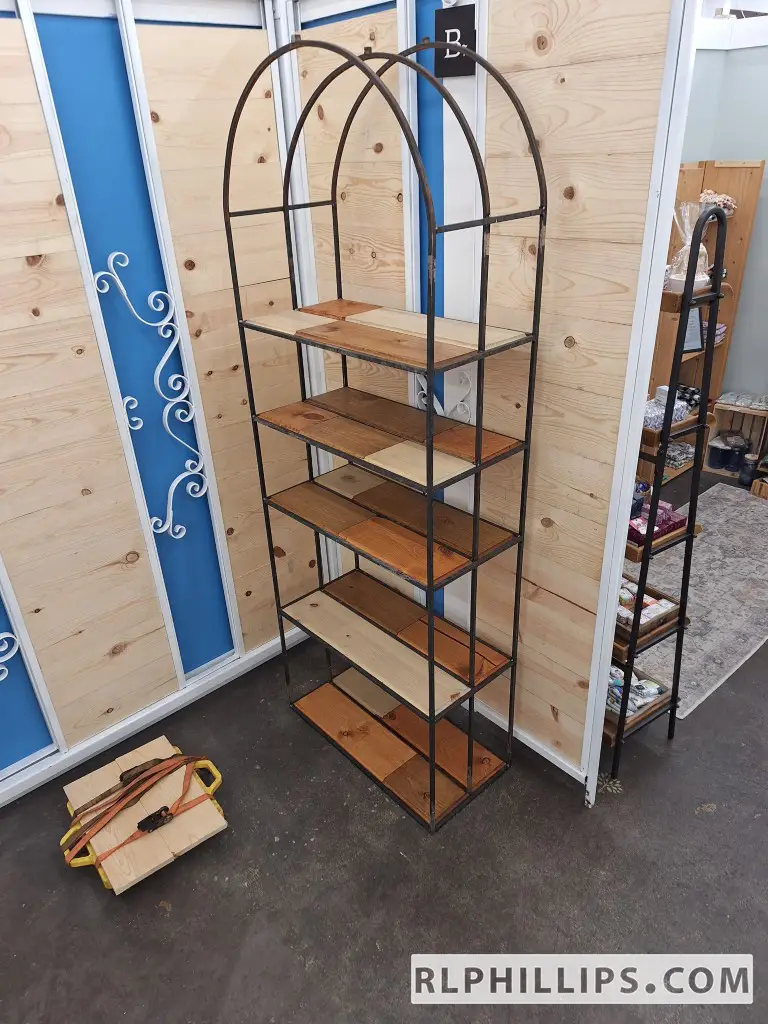
Here you can see those alternating stain colors balancing out. 3 grays, 4 browns, and 3 reds. There had to be a winner and I was enjoying the brown.

Here I blew out an edge while routing like a lunatic. I wasn’t all too careful, but I also didn’t have a particular reason to be. I was completely okay with this project looking battle scared, worn and loved. If I was building this for you, the chip wouldn’t have happened. Or it would have been replaced. For me in this situation it was 1,000% okay.

I really wanted this thing to look like what it was. A menage of parts coming together to make something unique. Instead of trying to sleek them together, I want you to see everything. I alternated stains on every piece and tried to keep an overall color balance.
It’s a small thing that I didn’t get a great picture of. I used weather proofing nails to join the wood.

The are too small to do an adequate job of joining. What they lack in strength they make up for being shiny copper. They look cool and add a little touch.
Anyway, time to start fitting wood.


I sat every piece into its predestined locations and hit them with basic wood screws. The slots in the support slats were big enough for the screw shank to fit through. The slot is too narrow for the head to pass through. This is where the strength is coming from in this build.


Once it was assembled it was straight onto the truck.


The bottom shelves are at 18″ and the shelves above are at 11″ apart. It’s rather tall being about 7′ and some change to the peak. It seems like it would be a little spindly or wobbly but it is solid. I think it looks pretty cool, especially knowing it was growing tomato’s the last few years!